Mexican birth certificate: source and English translation
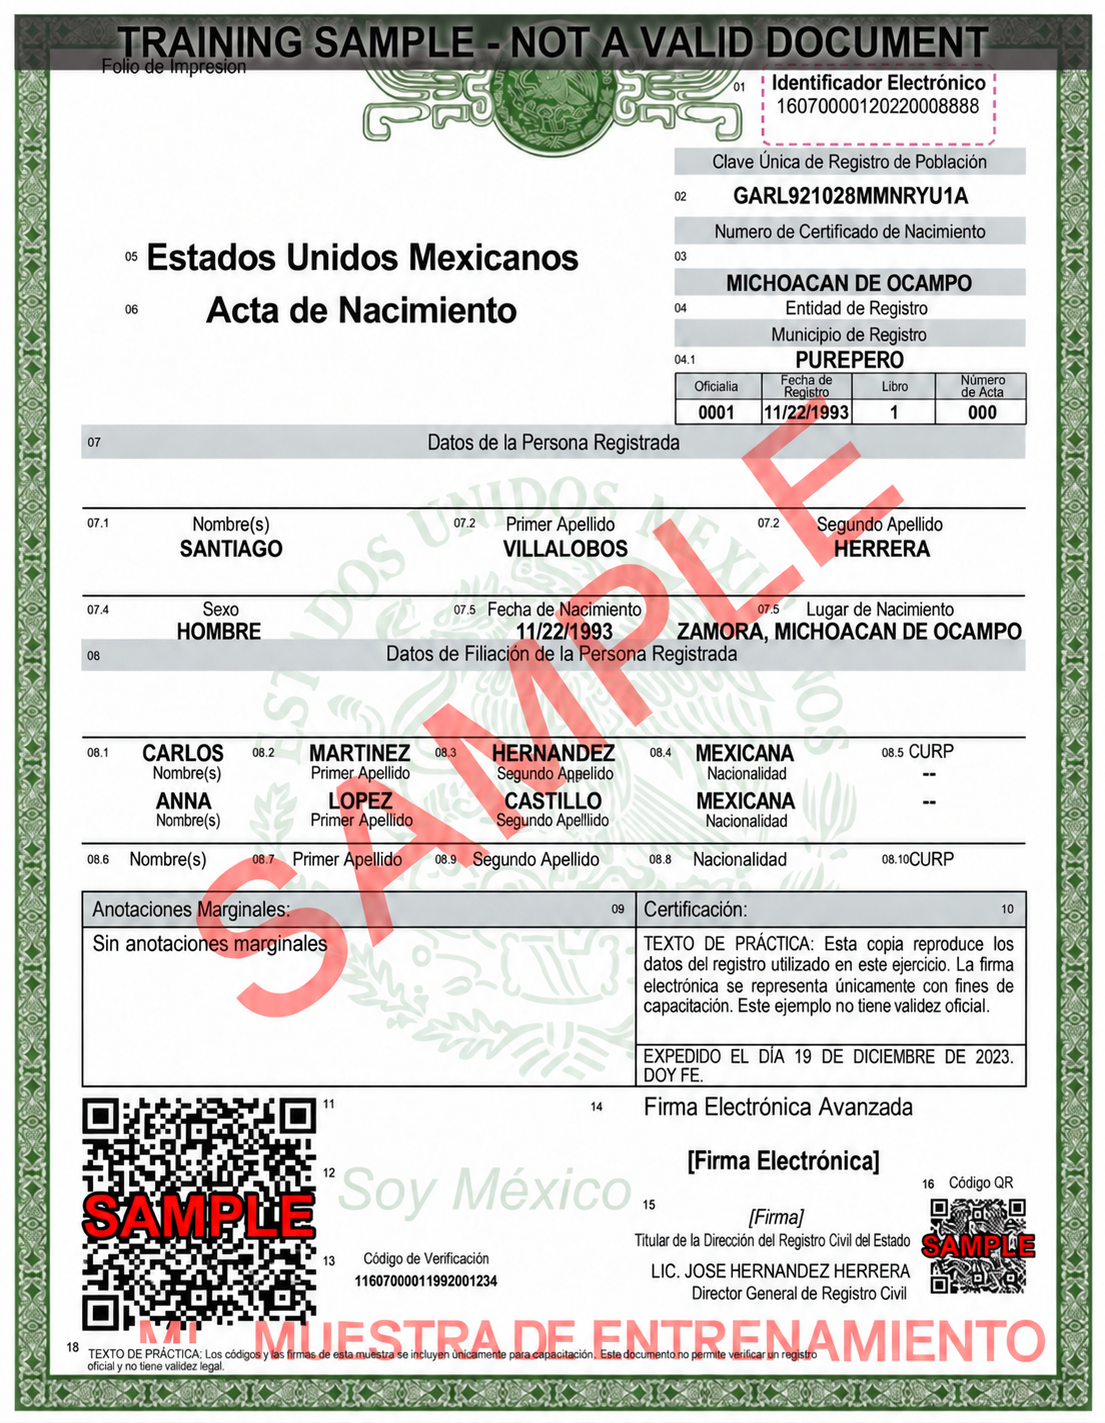
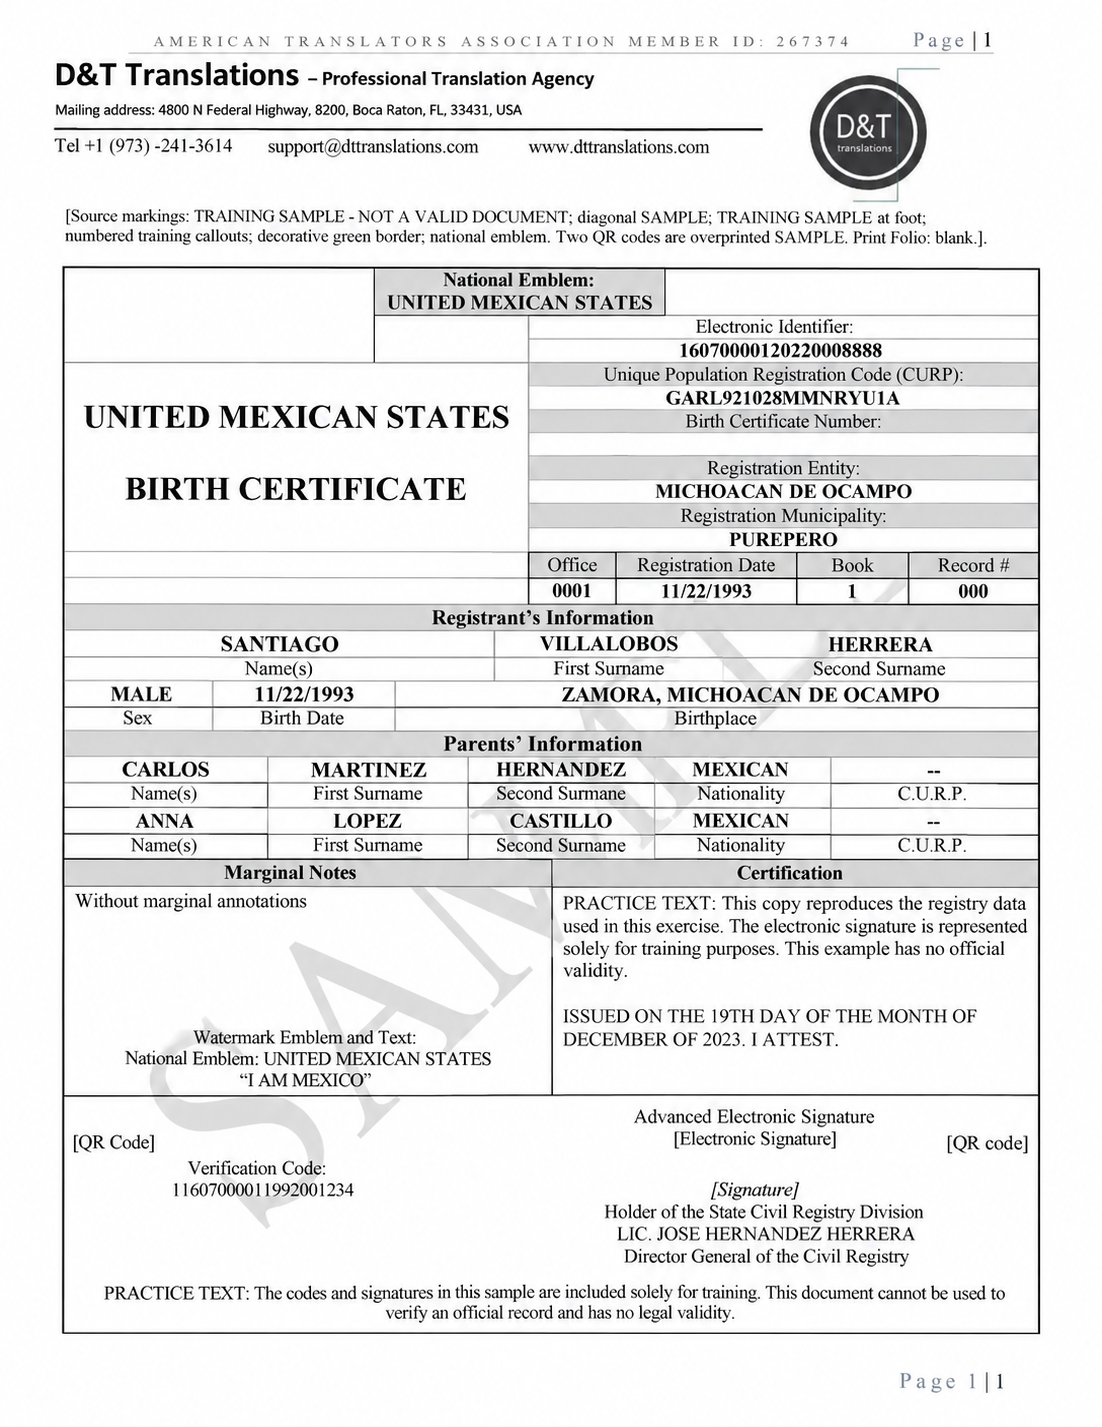
Click either image to open a larger version. These corrected training copies keep the supplied samples’ original designs. Names, dates, and identifiers are retained. Mixed-language labels and garbled passages have been corrected for the exercise.
1. Aim for a clear, complete translation
Your reader should be able to find each item from the original in the English translation. Keep related information together, translate the wording, and describe graphics when needed.
You do not have to recreate security features. For example, type “[signature]” where a signature appears instead of drawing it. A clear table can show the original’s structure without copying its decorative border.
The English sample shows a useful layout: boxed fields, gray headings, short labels, and clearly separated sections. It is a training image with a separate agency letterhead, not an editable Word file. The steps below show one practical way to build a similar layout in your own agreed template.
2. Open your template and save a working copy
- Start with the agreed Word file. This may be an Agency Word Template, a Company Letterhead File, or your own professional template. Save a new copy, such as
birth-certificate-working.docx. DOCX is Word’s editable file format. - Check the page setup. In Print Layout view, open Layout → Size and Layout → Margins. Use the paper size and margins required for the job. Do not guess them from the sample image.
- Keep the letterhead intact. The header is the area at the top of the page; the footer is at the bottom. Leave the supplied company name, logo, contact details, page numbers, and certification area in place. Ask for a template adjustment if the body text overlaps them.
- Show the formatting marks. Click Home → ¶ (Show/Hide). This reveals spaces, tabs, and paragraph breaks. For example, five empty paragraph marks can explain a large gap. These marks normally do not print.
- Paste text carefully. If pasted text brings in the wrong fonts or spacing, use a text-only paste option and apply the template’s styles. Save, close, and reopen a working copy to check it.
Word’s menus vary by version and device. These steps mainly describe desktop Word. Use the desktop app if your template needs table or watermark features that Word for the web does not provide.
Use the same steps for other languages → English
The example is Spanish → English. The same layout method works for French → English, German → English, Arabic → English, Chinese → English, and other source languages. Follow the fields on the actual original rather than adding fields simply because they appear in this Mexican sample.
If you work with an agency, keep its agreed template. If you work independently, use your own professional template that meets the receiving office’s requirements. In this lesson, “approved template” simply means the file agreed for your job.
Keep names readable and give English text enough space
Choose a font that shows every character you need. For example, François should not lose its ç because the chosen font is unsuitable. If the job requires an original-script name alongside its English form, check that the font displays that script correctly too.
Choose the right English spelling check for the job, such as U.S. or UK English. Do not let Word “correct” a personal name or code. A spelling check cannot tell you whether the English matches the original.
English may take more or less space than the source text. For example, a short Chinese label may become a longer English phrase. Widen the cell or let the text wrap onto another line. Do not delete words to make it fit.
When the original reads from right to left
An English translation of an Arabic or Hebrew certificate normally reads left to right. Keep each English label with its correct value. Do not reverse a name or code to imitate the original page.
If you must keep an Arabic or Hebrew passage as well, set that passage’s text direction correctly. Right-aligning text only moves it to the right edge; it does not set its reading direction. Keep Latin-letter codes and web addresses in their original order.
For example, if a code appears beside Arabic text, check its brackets and characters in both Word and the PDF. Copy the code from the PDF and compare it with the original to catch an order problem. Microsoft explains the right-to-left settings in Office.
Use English field labels and notes unless the job calls for a bilingual version. Have someone who can read the source language and English review the result. For other target languages, adapt the same steps to that language’s writing and layout rules.
3. Use styles to keep the text consistent
A style is a saved group of text settings. It can control the font, size, bold text, and paragraph spacing. Find styles under Home → Styles.
Use a small set of styles for titles, section headings, field values, field labels, notes, and longer paragraphs. Keep the styles already built into an approved template.
For example, SANTIAGO can be a bold field value, with “Given Name(s)” in smaller regular text beneath it. Use the same pair of styles for the other name fields. If you later change the label style, Word can update all those labels together.
Set paragraph spacing in the style instead of pressing Enter repeatedly. Let long names wrap naturally. Keep labels beside the right values even when their positions differ from the sample.
Start with the template’s readable font size. If the page is crowded, remove unnecessary gaps or add a page before making all the text tiny. The sample is an example, not a required font size. See Microsoft’s guide to creating and changing styles.
4. Use tables to line up the fields
A Word table is a grid of rows, columns, and cells. Each cell can hold a label or value. Choose Insert → Table to make one.
For example, use three columns for Given Name(s), First Surname, and Second Surname. Each value stays in its own cell even if a long name wraps. Repeated spaces or tabs will not keep a form aligned as reliably.
Break the page into manageable blocks
You can build one large table, or use several smaller tables for the main sections. Smaller tables are often easier to edit. Another option is a simple outer frame with smaller tables inside it. Avoid lots of floating text boxes, which can move unexpectedly or put text in the wrong reading order.
Keep the text editable; do not paste the whole translation as an image. Here is a suggested plan:
| Part of the page | Suggested table layout | What goes there |
|---|---|---|
| Title and identifiers | A title area on the left and a code area on the right, with room for an emblem note above. | Country and document title; print folio; electronic identifier; CURP; certificate number; registration locations. |
| Registration details | Four columns. | Office number, registration date, book, and record number. |
| Person’s details | A heading across the section, three name fields, then a row for sex, birth date, and birthplace. | Keep the birthplace cell wide enough for a long place name. |
| Parents’ details | A section heading, then five columns for each parent’s row. | Given names, both surnames, nationality, and CURP. Keep any printed dashes. |
| Notes and registry certification | Two columns, with enough room for the legal paragraph. | Marginal notes, the readable registry statement, law references, issue date, and attestation. |
| Signatures and verification | Separate groups for the codes and signature area, then a wide row for instructions. | Code descriptions and printed strings, signature wording, officer’s name and title, verification instructions, and a watermark note. |
Set the widths and cell spacing
- Keep the table inside the page margins. Select it and use Table Layout → AutoFit to fit the available width. Choose Fixed Column Width when you want the columns to stay at your chosen widths.
- Keep the table in the normal text flow. In Table Properties → Table, set Text wrapping: None. This helps the table stay in place as you edit the document.
- Leave a little space inside cells. Under Table Properties → Options, adjust the cell margins. These are the gaps between the text and the cell edges. Reduce excess padding before reducing the font size.
- Join cells for a wide heading. Select neighboring cells, then choose Table Layout → Merge Cells. For example, join the cells in a heading row so “Parents’ Information” can span the whole section. Check text order if the cells already contain wording.
- Divide a cell when you need more fields. Use Split Cells. For example, split a blank row into three fields for the person’s names.
- Give long values more room. A birthplace usually needs a wider cell than a short office number. Drag the column boundary or use the width settings.
For the top block, you could start with half the width for the title and half for identifiers, then adjust it. The exact ratio is up to the text and template. See Microsoft’s guide to widths, AutoFit, and cell margins.
5. Add lines, gray headings, and alignment
Borders are the lines around cells. Use Table Design → Borders to add the lines you need and remove those you do not. For example, keep an outside frame and the lines between name fields, but remove lines around a title if they make the page too busy. Do not draw lines with underscores.
To see cells with no printed borders, turn on Table Layout → View Gridlines. Gridlines help you edit; they do not print.
Shading is a cell’s background color. Select a heading row and choose Table Design → Shading for a light gray background. Keep dark text and check that it is easy to read in black and white. A plain frame is usually more useful than copying the original’s ornamental security border.
Alignment controls where text sits. Use Home → Paragraph for left, center, or right alignment. Use Table Layout → Alignment to move text toward the top, middle, or bottom of its cell.
For example, center a short name or code, but left-align a long certification paragraph. Use the same alignment for similar fields. Do not add spaces to push text to the right.
If a long name or code does not fit, widen the cell or reduce extra cell padding. If needed, adjust that field’s font size carefully. Do not delete characters or insert a hyphen into a name or code just to make it fit. Check the value again after changing the layout.
6. Keep text visible and manage page breaks
Let rows grow with the text
A row with an Exactly height can hide text that does not fit. Use automatic height or At least where appropriate. For example, a legal paragraph that grows from four lines to six should make its row taller, not disappear behind the bottom border.
In Table Properties → Row, clear Allow row to break across pages when a short row should stay together. A long paragraph may need to continue on the next page. If a row is taller than a page, forcing it to stay together will not solve the problem.
Keep a heading with its text
The paragraph option Keep with next keeps a paragraph with the one after it. It can stop a section heading from being left alone at the bottom of a page. Use it only where needed. If it is turned on for too many paragraphs, a whole table may jump to the next page.
Start a new page when needed
Use Insert → Page Break between complete blocks instead of pressing Enter many times. If a table continues onto another page, select its real column headings and use Repeat Header Rows. For example, repeat “Name” and “Nationality” above a continuing list, not all the person’s details.
A manual page break inside a table can stop its headers from repeating. Microsoft explains how repeating table headers work.
A section break lets one part of a Word file have different page settings. Use one only when needed, and check that it has not changed the letterhead or footer on the following page.
Use the real page count
Keep the template’s automatic page numbers. Word uses fields called PAGE for the current page and NUMPAGES for the total. These update with the document; typed numbers do not.
The corrected English layout is one page and shows “Page 1 | 1.” If your Word translation uses three pages, its page fields must show three. Keep translation page numbers separate from any page numbers printed on the original.
7. Add notes for graphics and label practice copies
Put a short note near the part it describes, such as “[signature],” “[QR code],” or “[barcode].” Translate any readable words on an emblem or stamp. Copy a readable printed code separately from the note describing its graphic.
The registry’s signature area and certification paragraph belong to the original. Your translator’s certification is separate. Keep those areas easy to tell apart.
Describe the original watermark
A watermark is faint text or a picture behind the main wording. In this sample, “[Watermark with national emblem and the words: I AM MEXICO]” describes the emblem and the words “Soy México.” “MUESTRA DE ENTRENAMIENTO” means “TRAINING SAMPLE.” Only describe features that are actually present.
Do not paste an official seal behind the translation, trace a signature, or generate a working replacement QR code.
Add a training watermark when allowed
To mark your practice copy, desktop Word provides Design → Watermark → Custom Watermark → Text watermark. You could enter “TRAINING SAMPLE — NOT A VALID DOCUMENT.” This is your practice label, not the original document’s watermark.
Word commonly places a watermark in the header. If you are using an agency file, use its approved draft-marking option or ask before changing the header. Do not disturb the company’s letterhead.
Keep the sample markings visible in these exercises. For real deliveries, follow the project’s draft and final-copy instructions. A watermark that was on the original is still part of the original; do not treat it as an optional draft label.
8. Check the Word file and the final PDF
- Compare the text with the original. Check each section, then check names, dates, and codes separately. Include small items such as the print folio, marginal notes, slogans, and bottom instructions.
- Look for hidden or cut-off text. Turn on Show/Hide and table gridlines. Remove unwanted empty paragraphs and page breaks. Check narrow cells, fixed-height rows, text boxes, and the area above the footer.
- Finish reviewing edits. Save a final copy, then accept or reject tracked changes and remove resolved comments as instructed. Choosing “No Markup” only hides changes; it does not remove them.
- Export with Word’s PDF option. Use the settings required for the job and keep an editable DOCX too. Keep text selectable and preserve available reading-order tags or bookmarks. Do not turn the page into a screenshot.
- Open the PDF you actually exported. Check every page, both close up and as a whole page. Look for missing accents, broken lines, hidden words, blank pages, and text touching the header or footer. Confirm the page count.
- Try selecting and copying text. For example, copy a long identifier from the PDF and compare it with the original. This can reveal missing characters or an incorrect reading order.
- Check the files you are sending. Confirm the names and versions, any required source copy, certification, signature, and the requested Word/PDF files. Do not add someone’s missing approval signature or claim that your translation proves the original is authentic.
9. Fix common Word problems
| What went wrong? | What to try |
|---|---|
| The table runs past the right margin. | Check the overall table width, its indentation, and AutoFit. Look for a long code forcing a column wider. Keep the table inside the page margins. |
| The last lines of a legal paragraph are missing. | Check whether the row height is set to Exactly. Let the row grow, reduce extra paragraph spacing or padding, or let the paragraph continue onto the next page. |
| The whole table jumps to the next page. | Check Keep with next, row-splitting settings, and tall rows. A long chain of paragraphs kept together may be causing the jump. |
| There is an unwanted blank page at the end. | Turn on ¶. Look for an extra page/section break or the paragraph after the last table. Adjust its spacing without deleting required certification or footer content. |
| The logo or footer moves or disappears. | Compare with a fresh template. Check section breaks, Different First Page, and Link to Previous. Link to Previous controls whether a section shares the previous section’s header/footer. Ask for help with the template if needed. |
| A long name breaks awkwardly. | Widen its cell or reduce extra cell padding. Do not shorten the name, change surname order, or add a hyphen that is not in the original. |
| The PDF looks different from Word. | Check fonts, paper size, and export settings. Fix the Word file and export it again, then open the new PDF to check it. |
Try it yourself
Using the samples at the top, build an editable practice file in your agreed training template. Include the title and identifiers, the person’s details, parents’ details, notes, registry certification, and signature/code areas.
Keep a training label on your practice file. Use the corrected Spanish training text as your source and the English image to check your result. If you later work with a real source containing unclear text, flag it and ask for clarification instead of borrowing wording from another sample.
Your file is ready for review when a reader can find every item, read the text comfortably, and copy codes without losing characters. Check that the letterhead is intact and the PDF has no cut-off text. Ask a reviewer to check both the translation and its layout.
Further reading and scope
These lessons are for agencies and independent translators. The images are corrected practice samples, not official documents or signed certified translations. Use the examples to learn the method, then follow the instructions for your own job and the office receiving it.
- ATA: What Is a Certified Translation? — U.S. certification context.
- AUSIT: Official and Legal Document Best Practices — supplementary professional guidance; Australian conventions may differ.